Technological advancements have increased the demand for enhanced infrastructure with quick deployments. Public cloud providers are constantly upgrading their policies and infrastructure to match ever-growing business requirements. This competition gives businesses the ability to choose the cloud provider(s) that best fit specific governance and cost-effectiveness needs.
In this blog, we discuss migrating databases from SQL Server on Azure VM to Snowflake on AWS.
Understanding the Problem
Microsoft Azure is a cloud computing offering for Microsoft-managed data centers, whereas Snowflake is a cloud-based data warehousing solution that provides software-as-a-service (SaaS) based on various public cloud providers.
In this scenario, we need to migrate the SQL Server databases to Snowflake. There is also a need for the migrated data to be put in Snowflake with multiple schemas for database names with the data in the precise and correct form.
While Azure supports ingestion from various sources and clouds, it did not support direct egress to other cloud providers. Finding a workable solution for moving egress to AWS-based Snowflake was the first challenge.
Our Approach to Migration
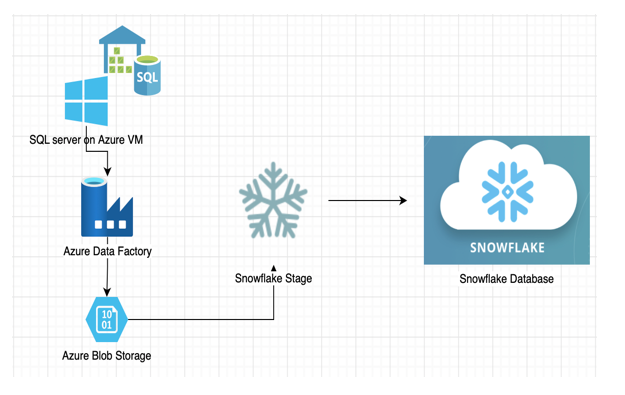
According to the Snowflake documentation, Snowflake has a stage feature that could address the above issue. It is, essentially, a path in which the data files that need to be ingested are stored, similar to the concept of SMB Samba mount. Using Snowflake Stage allowed it to load Azure Blob storage, after which Snowflake could read and ingest the data in flat files. The next step was to move data from SQL Server to Azure Blob storage.
The Migration Process
The migration process consisted of the following steps:
- Replicate the database schema in Snowflake as per Azure SQL database
- Set up Azure Data Factory pipeline to create parquet snappy format flat files on Blob storage.
- Use parquet files for data compression and quick data load in Snowflake
- Create file format in Snowflake
- Create or replace file format <file_format_name> type = ‘parquet’;
- Create Stage in Snowflake
- create or replace stage <Stage_Name>
- url='<Azure Blob file/folder path>’
- credentials=(azure_sas_token= <token>)
- file_format = <file_format_name>;
- To verify if files are staged
- list @ <Stage_Name> ;
- Finally, load data to Snowflake table from Stage
(Note that all parquet data is stored in a single column ($1))
copy into TEST1
from (select
$1:CustomerID::varchar,
$1:NameStyle:name::varchar,
$1:Title:city.bag::variant,
$1:FirstName::varchar,
$1:MiddleName::varchar,
$1:LastName::varchar,
$1:Suffix::varchar,
$1:CompanyName::varchar,
$1:SalesPerson::varchar,
$1:EmailAddress::varchar,
$1:Phone:name::varchar,
$1:PasswordHash::varchar,
$1:PasswordSalt::varchar,
$1:rowguid:name::varchar,
$1:ModifiedDate::datetime
from @ <Stage_Name>);
Let’s break down the details of each step in the process.
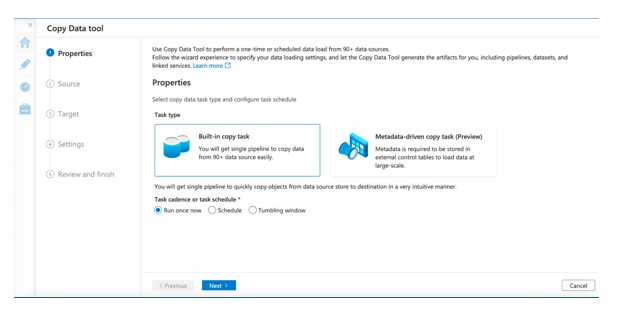
1. Leveraging Azure Data Factory
Azure’s Data Factory is a GUI-based tool that facilitates an end-to-end ETL solution and provides a step-by-step guide for building the pipeline. It has Source (SQL server), Target (Blob storage) and the necessary settings for tuning the performance of the pipeline. These offerings made it a perfect solution for the customized needs of this migration project—which was to wrangle the data before exporting to Blob storage. This was addressed seamlessly by Data Factory which is covered in detail in the later section of this blog.
2. Tuning the Performance of Data Factory Pipeline
The tricky part of this migration was that while the pipeline was easy to build, utilizing its full potential and deriving optimum performance was a challenge.
There were terabytes of data that needed to be exported to Blob from SQL, which would have taken weeks to transfer without tuning. After adequate POC, it was found that Data Factory could support dynamic range in reading data from the source.
Let’s say there is a table XYZ that is 800 GB. As per the approach mentioned above, Data Factory is required to move the huge amount of data into Blobs. With the traditional method, the GUI, by default, writes the data to Blob serially which would be slower.
Now, if we look at the table XYZ with a column “date”, the 800 GB of data can be partitioned into small sets depending on month or year. This would mean that each partition is not directly dependent on other date partitions and can be written in parallel. This will be quicker and more resource-efficient.
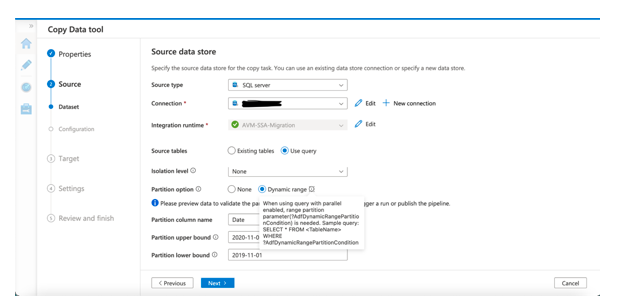
This can be achieved by using the dynamic range filter which can be only applied by writing the select statement rather than selecting the checkbox of the existing tables.
3. Using Parquet File
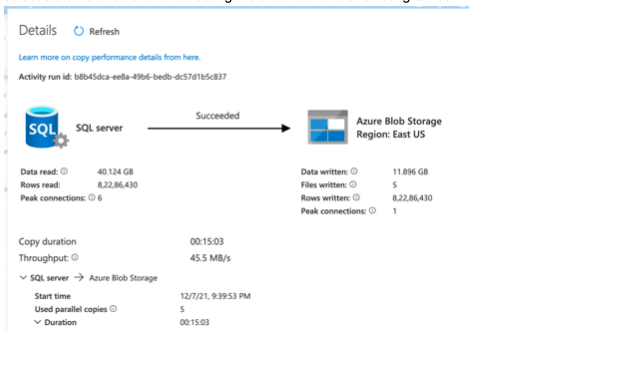
The exported data needed to be stored in a flat file while maintaining integrity and compression. CSV was the first choice but during POC many challenges were faced while writing the file, maintaining the spaces and new line characters which corrupted data. The Data Factory offered the Parquet format of a file that had a great compression rate (75%) and also maintained the integrity of the data. Parquet was optimized to work with complex data in bulk and thus was suitable for this project. With respect to the above figure, it can be seen that 40GB of data was compressed to 11GB.
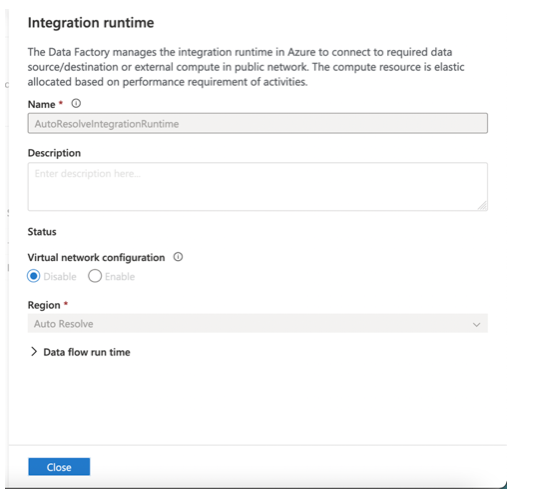
4. Integration Runtime
For the Data Factory to work, it required more compute power which was facilitated in the following ways:
- Auto-Resolve Integration Runtime
As the name suggests, the compute resources were managed and assembled by the Microsoft data centers and the cost was incurred on a per-unit basis. The region of these resources was automatically decided based on availability. This is selected by default when running a Data Factory pipeline.
- Self-Hosted Integration Runtime
This runtime uses the resources that already exist. For example, the self-hosted IR allowed downloading a client program on the machine for the resources required and creating a service and coupling it with the Data Factory.
4. Setting up the Self-Hosted Integration Runtime
This was the best available option as the SQL server was already hosted on a standalone Azure VM, which provided the freedom to use the full capacity of resources attached to it. It included the following steps:
1. Setting-up Self Hosted IR
- For Azure Data Factory to work with Azure VM it needed to set up the Azure Data Factory Integration Runtime
- In Azure Data Factory, select “Manage” and then “Integration Runtimes”
- Select “+ New”, then “Azure, Self Hosted”,
- Next, select “Network Environment -> Self hosted”
- Next, give a suitable name to the self-hosted IR
- Once the IR is created, Auth keys will be presented. Copy these keys
- Now as per the last screen, a link was provided to download Microsoft Integration Runtime
- Download and install the integration runtime from the Microsoft link
- Once installed, enter the Auth Key1 value and register “Launch Configuration Manager”
- When registered, the self-hosted IR will bind with the data factory
- Now, install the Java Runtime 64 bit as it is required for the self-hosted IR to work. Refer to this manual.
2. Create Linked Service in Data Factory
- Proceed to Data Factory
- Select “Manage” and then “Linked Services”
- Select SQL server as type of service and give it a suitable name
- Now under “Connect via Integration Runtime” select the created self-hosted IR
- Put in the server name. It is important to note that the server name should be the same name used to connect the SQL server successfully
- Put in the credentials and test connection
In the next blog, we shall look at some of the challenges encountered during the migration, cost-saving actions and our approach to data validation.
